On a piece of paper (or whatever is your preferred note taking means) draw a 2×4 cell table. Label the rows as follows:
| Left | |
| Right | |
| Entry | |
| Mission |
Use this table to set up a custom mission or campaign.
Map Generator
There are two versions of the Map Generator. Version 1 (V1) and Version 2 (V2).
Version 1 is for maps using only the board pieces that come supplied in the game box. Version 2 uses the additional board pieces (From original game expansions and some custom made. Copies can be downloaded here).
You can (if you have the additional pieces) use a mixture of both versions when generating maps to add even greater variation. Example, Left side use version 1 and right side use version 2.
Just using version 1 maps provides 864 different map variations. When combined with the different missions available this provides 20,736 combinations. This doubles to 41,472 when you mix version 1 and version 2 maps.
Mission Generator
- Roll 1xD12 and write down that number in the Left column.
- Roll 1xD12 and write down that number in the Right column.
- Roll 1xD6 and write down that number in the Entry column
- Roll 1xD12 and 1xD6 and write down that number in the Mission column.
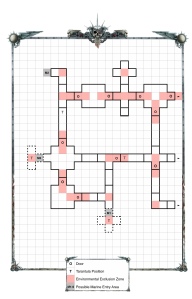
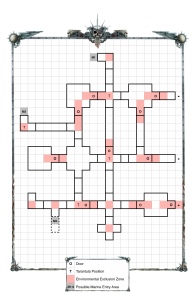
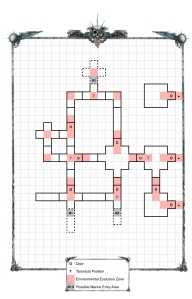
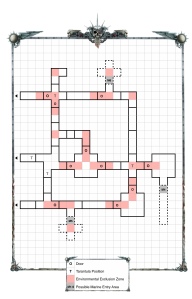
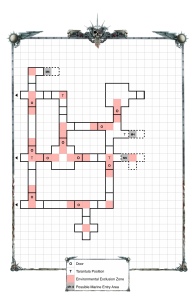
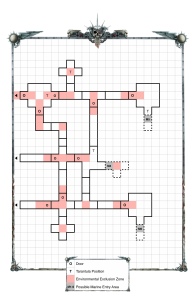
The Game Board
Assemble the Left and Right sides of the game board using the table below from the numbers rolled. For the moment, do not connect the sides together (the sides are only connected depending on the mission type selected).
The Marine Entry Area
The Marines main Entry area will be one of the marked areas on each of the side maps. Based on the Entry number rolled, 1-3 will be on the Left side map and 4-6 will be on the Right side map. Remove the board section(s) behind the marked area (where applicable) and replace with a 5 piece corridor section. If there are no board sections to remove then simple add a 5 piece corridor section.
If the Marine player has more than 1 squad, then they can add 1 additional Entry area (secondary Entry area). They do this by selecting a marked area to the left or right of their chosen area, but must be from the same side of the board. For example, if their chosen marked Entry area was 5, then they can choose either 4 or 6. If their chosen marked Entry area was 6 however, then they can only choose 5 as their secondary Entry area.
The Marine Exit Area
If the mission details state that Stealer player chooses the Marine Exit Area, then they must choose one of the unused Entry Areas marked 1-6.
Tarantula Deployment Positions
These are marked on the maps as a T and are only applicable with the Establish a Perimeter mission.
LEFT SIDE
RIGHT SIDE


The Mission Type
Now look up the selected Mission type using the Links from the table below:
| D12 | D6 | Mission |
| 1-3 | 1 | C.A.T Hunt |
| 2 | Seek and Retrieve | |
| 3 | Rescue | |
| 4 | Establish a Perimeter | |
| 5 | Revive and Retreat | |
| 6 | Trapped! | |
| 4-6 | 1 | Set and Run |
| 2 | Regroup | |
| 3 | Passing Through | |
| 4 | Restore the Outer Shields | |
| 5 | Ambush! | |
| 6 | Delivery | |
| 7-9 | 1 | Purge the Nest |
| 2 | Activate the Console | |
| 3 | Retrieve the Relic | |
| 4 | Death from below! | |
| 5 | We have to go around! | |
| 6 | Separated from the Group | |
| 10-12 | 1 | Seal the Breach |
| 2 | Restore the Power Generators | |
| 3 | They’re heading your way! | |
| 4 | Hunt the Bio Morphs | |
| 5 | Descend | |
| 6 | To the Last |
Campaign Generator
This will generate a 4 Mission campaign so you will need 4 copies of the Custom Mission tables.
Fill in the table in exactly the same way as for the Mission Generator but for each Mission Type, roll 1x D6 and use the tables below:
Mission 1
| D6 | Mission |
| 1 | Establish a Perimeter |
| 2 | C.A.T Hunt |
| 3 | Retrieve the Relic |
| 4 | Delivery |
| 5 | Hunt the Bio Morphs |
| 6 | Seal the Breach |
Mission 2
| D6 | Mission |
| 1 | Passing Through |
| 2 | Descend |
| 3 | Separated from the Group |
| 4 | Rescue |
| 5 | Activate the Console |
| 6 | Regroup |
Mission 3
| D6 | Mission |
| 1 | Revive and Retreat |
| 2 | Death from Below! |
| 3 | We have to go around! |
| 4 | Passing Through |
| 5 | Seek and Retrieve |
| 6 | Ambush! |
Mission 4
| D6 | Mission |
| 1 | Restore the Power Generators |
| 2 | They’re heading your way. All of them! |
| 3 | Set and Run |
| 4 | Purge the Nest |
| 5 | Restore the Outer Shields |
| 6 | Destroy to the Last |
The Marine player needs win 2 Missions and one of them MUST be Mission 4 in order to win. If the Marine player can only win mission 4 then it is a draw. Any other result is a win for the Stealers.

Credits
- Original Game Design: Richard Halliwell.
- This Advanced Edition Revision: Ken Allen
- Original Expansions and Revisions Design: Jervis Johnson, Matt Forbeck and Andy Chambers.
- Additional Material: Paul Murphy, Alex Goh, Dean H. Bass and Martin Kay.
- Illustrators: Dave Andrews, John Blanche, Wayne England, David Gallagher, Jes Goodwin, Pete Knifton, Ian Miller, Steve Tappin, Kevin Walker, Paul Bonner, Fangorn, Mark Gibbons, Paul Green, Gary Harrod, Tony Hough, Richard Wright, Tony Ackland, Nick Coleman and Ken Allen.
- Tactical Cards and Additional Counter Designs: Ken Allen
- Copyright: All original game design, artwork, concepts and story are owned by Games Workshop: UK – Games Workshop, Willow Road, Lenton, Nottingham, NG7 2WS – US – Games Workshop, 6711 Baymeadow Drive, Suite A, Glen Burnie, Maryland 21060-6401 – Australia – Games Workshop, 23 Liverpool Street, Ingleburn, NSW 2565 – Canada – Games Workshop, 2679 Bristol Circle, Unit 3, Oakville, Ontario, L6H 6Z8
The owner of this web site advises visitors to buy original products, where available, from Games Workshop. The contents of this site are intended as additional fan-made material for existing owners of the original editions of Space Hulk by Games Workshop only.
